Have you heard the saying “millennials skipped the mid-life crisis and headed straight into granny hobbies?” That’s me!
I started getting into food preservation over the past three to five years, namely because of our large garden. I love learning about and preserving food that we grow on our own land!
This guide explores the fundamental principles of food preservation, encompassing various techniques, pros/cons and tips of each. Just as the title suggests, the principles, or the main things to know. I also have a video here that goes into a variety of techniques including pros and cons of each, if you’re interested.
Why should we preserve food?
The minute food is pulled from its source, like the ground, is when food degradation starts. So it’s imperative that we find a way to slow the degradation for food safety, quality and nutrient preservation.

The most common types of food preservation are:
- Root cellar storage
- Fermentation
- Freezing
- Hot water bath canning
- Pressure canning
- Freeze drying
- Dehydration
This list doesn’t specifically discuss meat preservation. Nor does it include pickling or jam making which I feel can fall under canning or freezing respectively depending on your preferred method.
Root Cellar Preservation
This is about as easy as it comes. The preparation is more about having a well prepared space, so let’s talk about those requirements.
Technique:
- Choose a well drained area surrounded by soil with natural insulation
- Good ventilation, both in your space and between your plants, ideally cool air flows in low at your feet and warmer air flows out toward the ceiling
- Temperatures are 32-40 degrees fahrenheit and high humidity, 85-95% (because plants are mostly water)
- To maintain humidity you may want to have a dirt floor, surround the produce in sand, or moist sawdust or place pans of water around your space
- I strongly recommend buying one of those temperature/humidity gadgets to keep track of your preservation, and be sure to monitor your produce often!
Pros:
- The most simplest form of food preservation
- No need for electricity or energy sources to maintain food
- Cost-effective compared to other food preservation methods that require equipment or storage containers
Cons:
- Climate dependence/temperature fluctuations, if you don’t control your cold storage within the proper range of temperature and humidity you may risk losing your food!
- Requires a designated “cold storage” space
- Pests can be a problem, ensuring someone else doesn’t get to your food first is a must!
Nutrition:
- There’s minimal nutrient loss to just “store” your produce. However, as with all food, once it’s pulled from the source (like a vine), food immediately begins losing nutrients.
- Overtime, water soluble vitamins and antioxidants are reduced in cold storage.
- Also to note, this natural nutrient degradation doesn’t account for the cooking method you choose once you consume your produce.
Tips for success:
- Some crops should be “cured” first before being stored in a root cellar, this is done by laying them out in warm sun for a few days.
- Make sure you only store healthy, unblemished, dry produce
- Separate ethylene producers, separating fruits like apples or pears away from veggies that may prematurely rot
- Best candidates for root cellars are root veggies (winter squash, potatoes, pumpkins, hardy greens, broccoli, cabbage, apples and pears)
- Always use the FIFO method; first in, first out. This means be sure to rotate your storage to avoid forgetting some for too long, risking rot. The saying “one bad apple ruins the lot”, couldn’t be more true….
Storage duration: depending on the health of the produce, and your cellars conditions you can store most food between 2 and 8 months.
It’s like grocery shopping at home, how fun is that!??!
Fermentation
This preservation is really one after my own heart, since I am a functional nutritionist and focus on gut health; those probiotics and ferments are just perfect! Plus, again, a very low cost, easy way to preserve your garden!
Technique:
- Fermentation is essentially controlled food decay. Bacteria slowly consume the sugar in the food making it more acidic. The lower pH makes the food inhospitable for bacteria and yeast to survive.
- First start with unblemished, quality produce. Add your salt, brine as needed and be sure your produce is completely submerged in brine.
- I always check the pH of my ferments before eating to ensure safety, less than 4.6 is safe. This blog talks about fermentation safety.
- Never store your ferments in direct sunlight
- Keep them at room temperature, storing above about 75 degrees or below about 60 will result in faster or slower ferment times, respectively.
Pros:
- Enhanced flavor and nutrition! The only preservation method that actually improves nutrient absorption.
- For me, a lot of fermentation had to do with getting comfortable with leaving food on the counter (it’s those food safety classes I had in college!) But once you do, it’s another very simple food preservation method that requires little hands-on time.
Cons:
- Requires careful monitoring over days to weeks to achieve desirable results.
- To some, fermented foods have an off putting odor and are undesirable to eat.
- Contamination can occur which requires you to pitch your food, this is why I like smaller batches!
Nutrition:
- This is the only method of food preservation that actually improves the nutrient profile of the food.
- Some studies show that with the bioavailability of nutrients like polyphenols may improve.
- And, the regular consumption of probiotics in your diet will improve your microbiome associated with a whole host of health benefits.
Tips for success:
- Read my blog on the best veggies to ferment as a good starting point; in it I recommend starting with foods you already like in their raw state.
- In my opinion shredded veggies are some of the easiest to ferment.
- Use pH strips to test the pH of each ferment so that you can feel more comfortable and regularly “check in” on your ferments.
- Label your jars with dry erase markers to track fermentation days.
Storage duration: 3 – 6 months on average, some foods like fermented lemons, up to a year.

Freezing
Freezing is my go-to preservation method for ease and versatility. However, the downside is that it requires freezer space.
Technique:
- Freezing food minimizes contact with heat, light and air – which are the three factors that degrade food.
- Freeze food in a single layer spread out on a baking sheet before packaging. Then work quickly to pack to avoid thawing.
- I recommend freezing food in various forms, and sizes to fit their eventual uses. For example, shred some zucchini in 1-2 cup portions to easily thaw and make your favorite zucchini bread.
Pros:
- Minimal nutrient loss
- Easy and convenient method of food preservation
- Generally retains the flavor and texture of most foods (note that it’s not the best choice for all foods though).
- The most versatile choice of food preservation, I think.
Cons:
- Textural changes in high water content food like greens, noodles and eggs.
- If temperatures aren’t maintained, or food wasn’t properly frozen, freezer burn may occur.
- The biggest con in my opinion, freezer space…
Nutrition:
- Freezing maintains most of a foods’ nutrients, which is another reason I love it so much. However, water soluble nutrients, like Vitamin C are more vulnerable.
Tips for success:
- A favorite method of mine is to freeze greens mashed into muffin cups so that my greens are in 1-2 cup portions for soups, smoothies and the like.
- Invest in a vacuum sealer, it doesn’t have to be fancy. Ours is a dated model, but this one is similar. Vacuum sealing removes oxygen which is required for mold and bacterial growth prolonging the shelf life of your food.
- You don’t always have to use parchment paper to line trays (I find this wasteful and usually just warm the bottom of my tray to ease the food from it).
- But I do recommend “pre-freezing” each portion individually first.
- For small jars, like jam or pesto, pack them into a clear plastic container to keep them tidy and easily visible.
Storage duration: In good conditions and packaging, you can freeze food at a high quality for a year or so.
How water bath canning
Hot water bath canning is a method used to preserve high-acid foods by processing them in boiling water. More basic (less acidic foods), require pressure canning.
Technique:
- This technique is based on an acidic, anaerobic environment (no oxygen) to achieve shelf stability. Storing in a cool, dry and dark place extends the quality of the food.
- Begin by sanitizing jars and equipment, prepare your food according to tested recipes and place the sealed jars in a pot of boiling water for the duration of processing.
- Remove the jars and let them cool for a day or so, the lids will seal during this time.
Pros:
- Canned food is the pilgram of fast food.
- A great way to become accustomed to canning as the process is a little less intimidating than pressure canning and you can get acclimated with the setup and process.
Cons:
- Can be a more intimidating process than others.
- Requires a bit more planning, thinking through the process and preparing equipment and your space is a great first step!
Nutrition:
- Some nutrient loss with the initial cooking and hot water processing, like Vitamin C.
- However, some nutrients like fat soluble vitamin A can increase with heat and fat, like adding olive oil.
Tips for success:
- Use a large pot with a rack to keep jars off the bottom, and ensure jars and lids are intended for canning.
- Use tested and approved canning recipes from trusted sources such as the USDA or university extension programs.
- Ensure the food being canned is high-acid or has added acid (like lemon juice or vinegar) as required for safe water bath canning.
- Don’t try to “self-seal” by forcing the top down. Give the jars undisturbed time, 12-24 hours to seal.
- Be sure to label with a date and food name, just in case.
- As always, FIFO, first in first out.
Storage duration: Most canned foods held in a cool, dark place will keep for 1-2 years, safely.
Pressure canning
Of all of the food preservation methods this is probably the most intimidating. But it’s great for shelf stable food that doesn’t require refrigeration!

Technique:
- Similar to hot water bath canning, you’ll begin by sanitizing jars and equipment.
- Follow a tested recipe for pressure canning, place the food in jars and into the canner.
- Add just the right amount of water to the canner and place the lid on securely.
- Allow to heat and vent for 10 minutes or so and then place the weight gauge on the canner to begin building pressure.
- Once the desired pressure is reached, begin timing.
- After processing, cool the canner naturally by turning off heat and allowing it to cool.
- Once cool, remove the lid, then allow to rest undisturbed for 12 -24 hours and seal themselves.
Pros:
- Safe for low acid foods, most veggies, meat and soups.
- Kills bacteria by reaching temperatures above boiling, like clostridium botulinum.
- Flavor preservation, and in some cases flavor enhancing through the cooking process.
Cons:
- Initial cost of the canning can be a few hundred dollars, plus jars and accompanying equipment.
- It’s a bit more time consuming and complex than some of the other food preservation techniques.
- There is a risk of injury like burns, or simply glasses breaking .
Nutrition:
- Boiling can result in a loss of vitamin C and some B vitamins.
- However, there’s minimal heat at the time of consumption, like many other food preservation methods which cook the food later on; instead this nutrient loss (and cooking) happens before storage.
Tips for success:
- Use a reliable pressure canner and follow manufacturer’s instructions carefully.
- Maintain proper headspace in jars to allow for food expansion during processing.
- Use a non-metallic spatula to remove bubbles from jars before sealing.
- Adjust processing times based on your altitude.
- Monitor pressure, keeping a close eye on your weight gauge.
- Allow the canner to cool down naturally, forcing this to speed up can result in broken jars.
Storage Duration: Most canned foods held in a cool, dark place will keep for 1-2 years, safely.
Freeze drying
Freeze drying is literally what it says, first you freeze the food, then it’s dried. It’s also called astronaut food or hikers food, because it is lightweight and shelf stable.
Technique:
- This is a process to preserve food that first freezes the food to – 40 degrees fahrenheit, then removes the moisture in a vacuum. A final drying step to pull the last bits of moisture and you’re done! This process is called lyophilization.
- All moisture is pulled to inhibit enzymatic activity, maintaining food safety and quality.
- Which retains the foods texture, color, flavor and most of the nutrition.
Pros:
- It’s shelf stable, and with a little water can return close to its original state of texture and flavor.
- A fairly hands off, easy to use piece of equipment.
- The shelf stability and versatility of food makes it a great option for harvest preservation.
- No fridge or freezer necessary.
Cons:
- Biggest issue is most certainly the upfront cost of the equipment, which is often several thousand dollars.
- Though much of this is hands off, the process takes about one day, or even a few days depending on the food and quantity of food.
- The size of the machine itself can be about the size of a small dishwasher, around 30” tall and 25” deep.
- Requires special packaging, (Similar to vacuum sealing or jars/lids for canning).
- Freeze drying does not kill food borne pathogens, so if food is not handled properly during preparation there is a risk of food borne illness. So as always, use good manufacturing processes while you preserve.
Nutrition:
- Minimal nutrients are lost, it was found that vitamin C reduces in relation to more drying. This makes sense because if you remove more water, you lose more water soluble vitamins.
- Perhaps finding proper parameters for each food helps maintain nutrition better.
- Also, some foods, like fruits, may lend themselves to being reconstituted with 100% organic lemon or lime juice, which provides Vitamin C. Or try soaking the food before processing.
Tips for success:
- Always start with good, quality ingredients
- Try pre-freezing in your regular freezer, on a sheet pan before freeze drying to reduce the overall time (this can also kill parasites in foods such as venison).
- Always cut foods into uniform sized pieces.
- Do not overload the freeze dryer…. Just like my husband tells me everytime I load the dishwasher and the dishes come out, well dirty!
Storage Duration: Commercially freeze dried food can last 10-25 years or more, making it the longest lasting food preservation method! However, household freeze dryers are still too new, and may not maintain quite this long.
Dehydrating
This process removes all moisture inhibiting the growth of bacteria, yeast and mold.
Technique:
- Always start with fresh, unblemished food.
- Wash and cut into uniform pieces and place onto clean drying racks. Alternatively you can use your oven and cookie sheets, or the sun.
- Allow the food several hours to dry, test doneness by cutting and tasting.
- Store in airtight containers.
Pros:
- Doesn’t require special equipment if you’re willing to clog up your oven for a bit of time.
- Extended shelf life of your harvest, and no fridge or freezer necessary.
- Taste and texture variations of food like dried fruits and fruit leathers.
Cons:
- Takes several hours or days, however, if you have a special dehydrator it’s pretty hands off.
- If you have a lot of food it can take awhile.
- The cost of a dehydrator can be a few hundred dollars.
Nutrition:
- Due to the nature of dehydrating (you’re removing water) naturally you lose Vitamin C and B vitamins.
- It appears that more Vitamin C and beta carotene are lost when food is air-dried versus dehydrated.
Tips for success:
- Blanch or soak food in lemon juice to ensure desired color.
- Cut food into uniform pieces for even drying.
- Vacuum sealing can help preserve the food even better.
- Don’t overstuff or overlap food, dehydrating needs proper airflow to work best.
- Avoid dehydrating high fat foods.
Storage Duration: Most dehydrated food done properly can last 3 – 5 years or so. Not as long as freeze dried food because more moisture is left in the food.
Summary
- Regardless of the food preservation method, always use the FIFO method; first in, first out. This means be sure to rotate your storage to avoid forgetting some for too long, risking rot. The saying “one bad apple ruins the lot”, couldn’t be more true….
- Always use fresh, healthy, unblemished produce; preservation does NOT bring food back to life.
- Always take care to wash your hands, equipment and area. With many of these methods (except for canning), the preservation only inhibits the growth of foodborne pathogens, it doesn’t actually kill them. Which means upon consumption, the risk may still be present.
There are a variety of methods for a variety of foods and not typically right or wrong answers here. That’s why it’s good to understand the principles of food preservation so that you can see what works for you and your family! But if you’re interested in how I preserve my garden, check out my food preservation chart.
Principles of Food Preservation Chart

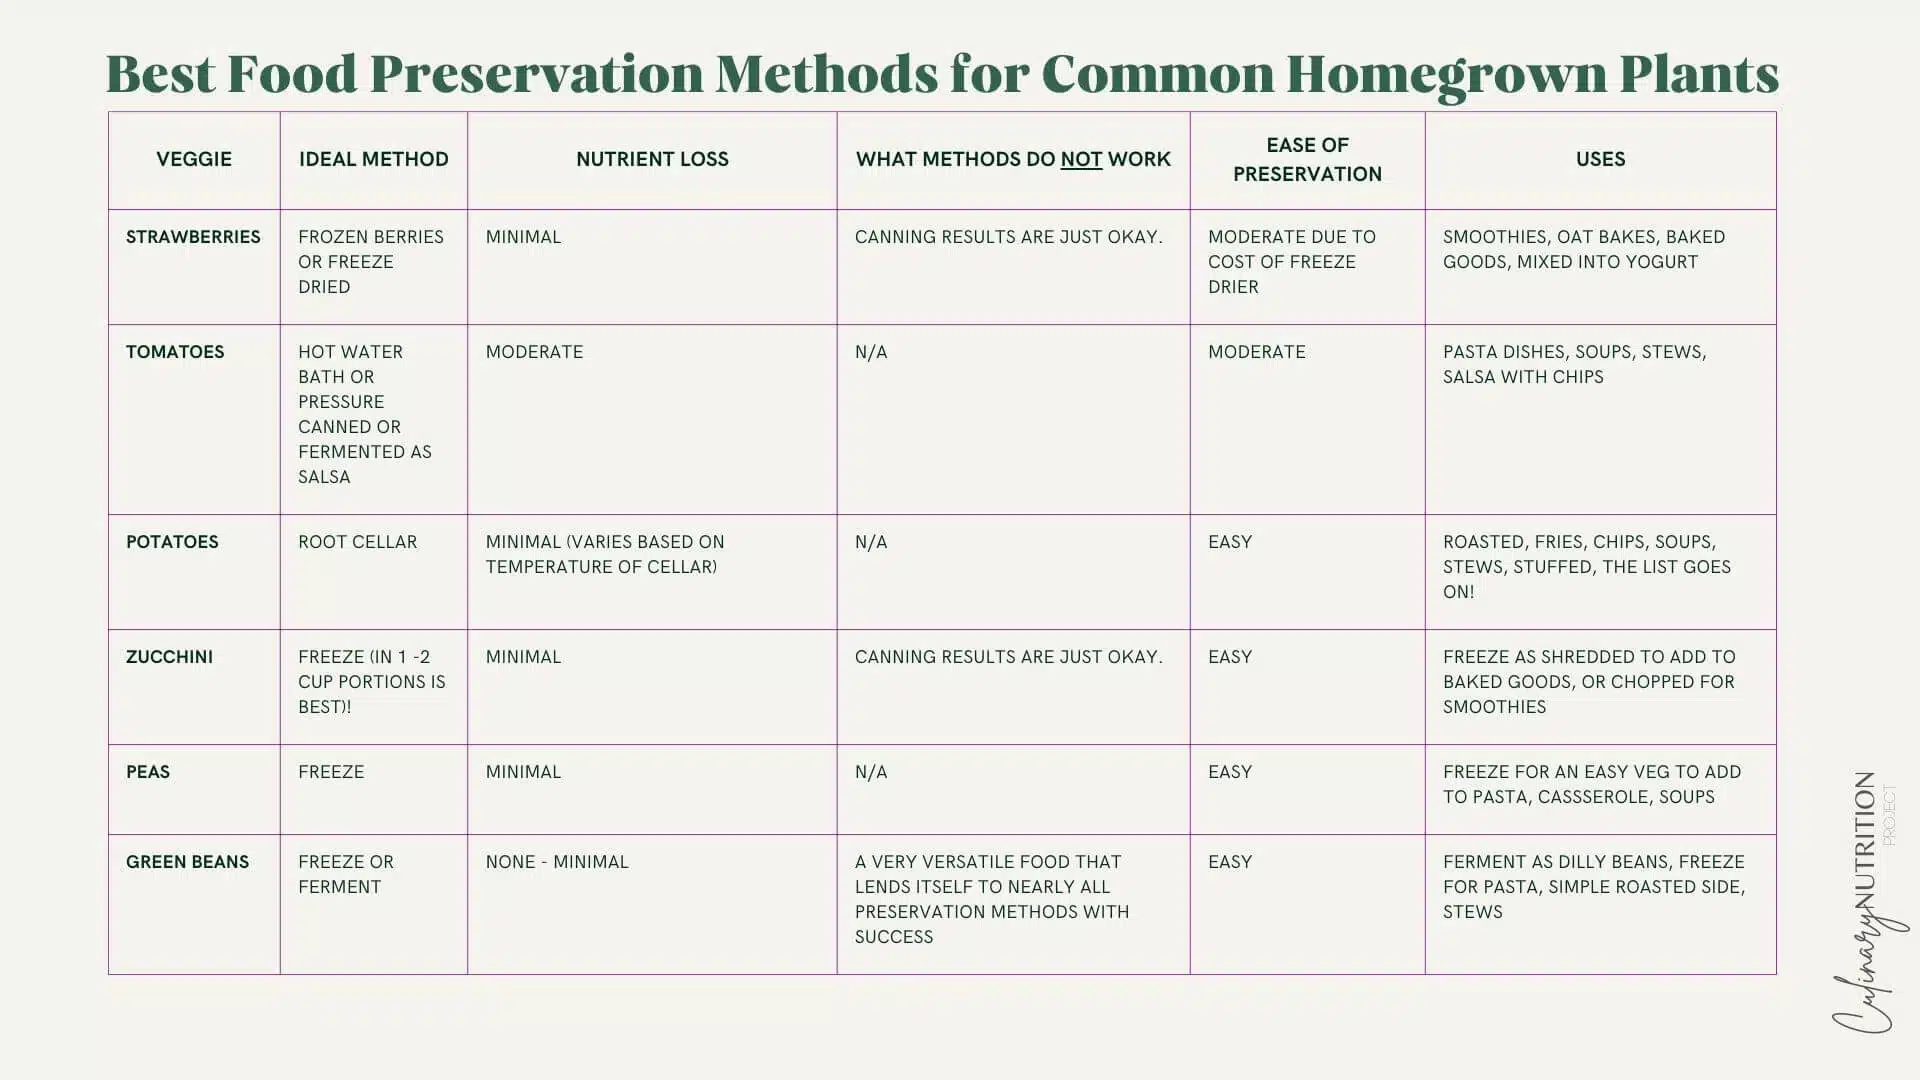

Do you want these charts sent right to your inbox for review later?
Since I focus on preserving fruits and veggies, this article refers to fruits and veggies and methods for other foods like dairy or meat will vary. I hope you found this article helpful in your journey to preserving your harvest.